
The recent AWS introduction of the Elastic File System gives you an automatic grow-and-shrink capability as an NFS mount, an exciting option that takes away the previous overhead in creating shared block file systems for EC2 instances.
However it should be noted that the same auto-management of capacity is not true in the EC2 instance’s Elastic Block Store (EBS) block storage disks; sizing (and resizing) is left to the customer. With current 2015 EBS, one cannot simply increase the size of an EBS Volume as the storage becomes full; (as at June 2015) an EBS volume, once created, has fixed size. For many applications, that lack of resize function on its local EBS disks is not a problem; many server instances come into existence for a brief period, process some data and then get Terminated, so long term managment is not needed.
However for a long term data store on an instance (instead of S3, which I would recommend looking closely at from a durability and pricing fit), and where I want to harness the capacity to grow (or shrink) disk for my data, then I will need to leverage some slightly more advanced disk management. And just to make life interesting, I wish to do all this while the data is live and in-use, if possible.
Enter: Logical Volume Management, or LVM. It’s been around for a long, long time: LVM 2 made a debut around 2002-2003 (2.00.09 was Mar 2004) — and LVM 1 was many years before that — so it’s pretty mature now. It’s a powerful layer that sits between your raw storage block devices (as seen by the operating system), and the partitions and file systems you would normally put on them.
In this post, I’ll walk through the process of getting set up with LVM on Debian in the AWS EC2 environment, and how you’d do some basic maintenance to add and remove (where possible) storage with minimal interruption.
Getting Started
First a little prep work for a new Debian instance with LVM.
As I’d like to give the instance its own ability to manage its storage, I’ll want to provision an IAM Role for EC2 Instances for this host. In the AWS console, visit IAM, Roles, and I’ll create a new Role I’ll name EC2-MyServer (or similar), and at this point I’ll skip giving it any actual privileges (later we’ll update this). As at this date, we can only associate an instance role/profile at instance launch time.
Now I launch a base image Debian EC2 instance launched with this IAM Role/Profile; the root file system is an EBS Volume. I am going to put data that I’ll be managing on a separate disk from the root file system.
First, I need to get the LVM utilities installed. It’s a simple package to install: the lvm2 package. From my EC2 instance I need to get root privileges (sudo -i) and run:
apt update && apt install lvm2
After a few moments, the package is installed. I’ll choose a location that I want my data to live in, such as /opt/. I want a separate disk for this task for a number of reasons:
- Root EBS volumes cannot currently be encrypted using Amazon’s Encrypted EBS Volumes at this point in time. If I want to also use AWS’ encryption option, it’ll have to be on a non-root disk. Note that instance-size restrictions also exist for EBS Encrypted Volumes.
- It’s possibly not worth make a snapshot of the Operating System at the same time as the user content data I am saving. The OS install (except the /etc/ folder) can almost entirely be recreated from a fresh install. so why snapshot that as well (unless that’s your strategy for preserving /etc, /home, etc).
- The type of EBS volume that you require may be different for different data: today (Apr 2015) there is a choice of Magnetic, General Purpose 2 (GP2) SSD, and Provisioned IO/s (PIOPS) SSD, each with different costs; and depending on our volume, we may want to select one for our root volume (operating system), and something else for our data storage.
- I may want to use EBS snapshots to clone the disk to another host, without the base OS bundled in with the data I am cloning.
I will create this extra volume in the AWS console and present it to this host. I’ll start by using a web browser (we’ll use CLI later) with the EC2 console.
The first piece of information we need to know is where my EC2 instance is running. Specifically, the AWS Region and Availability Zone (AZ). EBS Volumes only exist within the one designated AZ. If I accidentally make the volume(s) in the wrong AZ, then I won’t be able to connect them to my instance. It’s not a huge issue, as I would just delete the volume and try again.
I navigate to the “Instances” panel of the EC2 Console, and find my instance in the list:
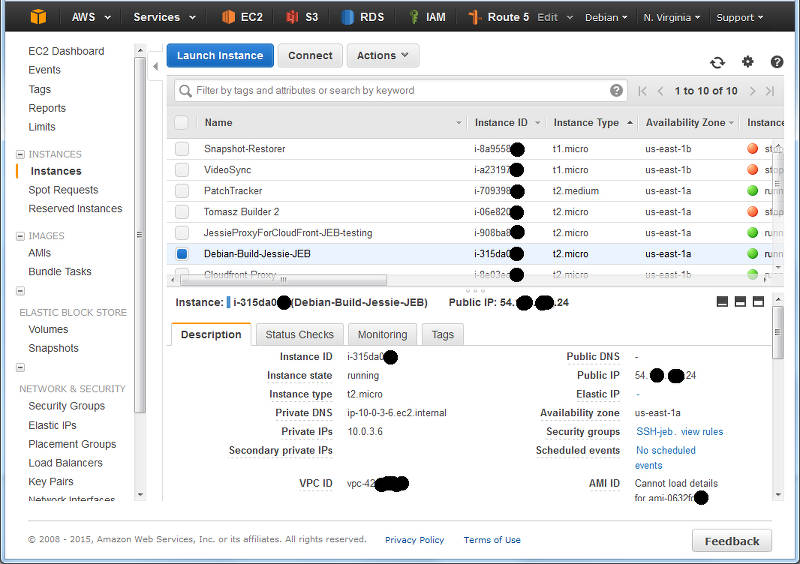
Here I can see I have located an instance and it’s running in US-East-1A: that’s AZ A in Region US-East-1. I can also grab this with a wget from my running Debian instance by asking the MetaData server:
wget -q -O - http://169.254.169.254/latest/meta-data/placement/availability-zone
The returned text is simply: “us-east-1a”.
Time to navigate to “Elastic Block Store“, choose “Volumes” and click “Create“:
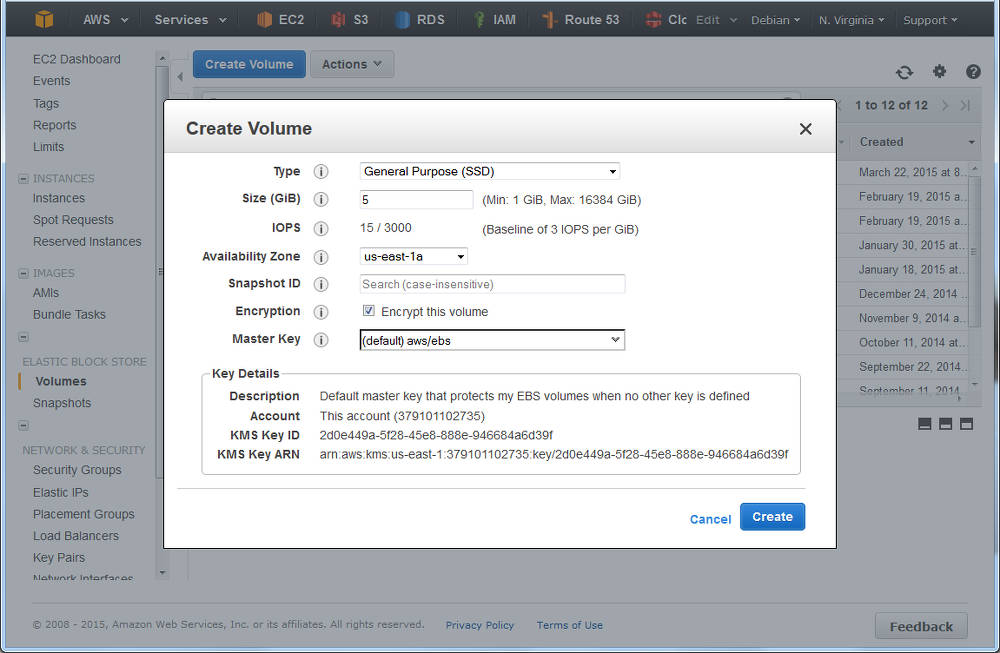
You’ll see I selected that I wanted AWS to encrypt this and as noted above, at this time that doesn’t include the t2 family. However, you have an option of using encryption with LVM – where the customer looks after the encryption key – see LUKS.
What’s nice is that I can do both — have AWS Encrypted Volumes, and then use encryption on top of this, but I have to manage my own keys with LUKS, and should I lose them, then I can keep all the cyphertext!
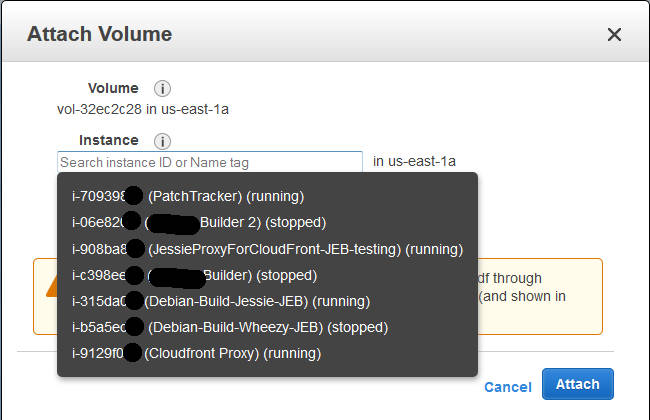
I deselected this for my example (with a t2.micro), and continue; I could see the new volume in the list as “creating”, and then shortly afterwards as “available”. Time to attach it: select the disk, and either right-click and choose “Attach“, or from the menu at the top of the list, chose “Actions” -> “Attach” (both do the same thing).
At this point in time your EC2 instance will now notice a new disk; you can confirm this with “dmesg |tail“, and you’ll see something like:
[1994151.231815]Â xvdg: unknown partition table
(Note the time-stamp in square brackets will be different).
Previously at this juncture you would format the entire disk with your favourite file system, mount it in the desired location, and be done. But we’re adding in LVM here – between this “raw” device, and the filesystem we are yet to make….
Marking the block device for LVM
Our first operation with LVM is to put a marker on the volume to indicate it’s being use for LVM – so that when we scan the block device, we know what it’s for. It’s a really simple command:
pvcreate /dev/xvdg
The device name above (/dev/xvdg) should correspond to the one we saw from the dmesg output above. The output of the above is rather straight forward:
 Physical volume "/dev/xvdg" successfully created
Checking our EBS Volume
We can check on the EBS volume – which LVM sees as a Physical Volume – using the “pvs” command.
# pvs
  PV         VG   Fmt  Attr PSize PFree
  /dev/xvdg       lvm2 ---  5.00g 5.00g
Here we see the entire disk is currently unused.
Creating our First Volume Group
Next step, we need to make an initial LVM Volume Group which will use our Physical volume (xvdg). The Volume Group will then contain one (or more) Logical Volumes that we’ll format and use. Again, a simple command to create a volume group by giving it its first physical device that it will use:
# vgcreate  OptVG /dev/xvdg
  Volume group "OptVG" successfully created
And likewise we can check our set of Volume Groups with ” vgs”:
# vgs
  VG    #PV #LV #SN Attr   VSize VFree
  OptVG   1   0   0 wz--n- 5.00g 5.00g
The Attribute flags here indicate this is writable, resizable, and allocating extents in “normal” mode. Lets proceed to make our (first) Logical Volume in this Volume Group:
# lvcreate -n OptLV -L 4.9G OptVG Â Rounding up size to full physical extent 4.90 GiB Â Logical volume "OptLV" created
You’ll note that I have created our Logical Volume as almost the same size as the entire Volume Group (which is currently one disk) but I left some space unused: the reason for this comes down to keeping some space available for any jobs that LVM may want to use on the disk – and this will be used later when we want to move data between raw disk devices.
If I wanted to use LVM for Snapshots, then I’d want to leave more space free (unallocated) again.
We can check on our Logical Volume:
# lvs
  LV    VG    Attr       LSize Pool Origin Data%  Meta%  Move Log Cpy%Sync Convert
  OptLV OptVG -wi-a----- 4.90g
The attribytes indicating that the Logical Volume is writeable, is allocating its data to the disk in inherit mode (ie, as the Volume Group is doing), and that it is active. At this stage you may also discover we have a device /dev/OptVG/OptLV, and this is what we’re going to format and mount. But before we do, we should review what file system we’ll use.
Filesystems
| Name | Shrink | Grow | Journal | Max File Sz | Max Vol Sz |
|---|---|---|---|---|---|
| btrfs | Y | Y | N | 16 EB | 16 EB |
| ext3 | Y off-line | Y | Y | 2 TB | 32 TB |
| ext4 | Y off-line | Y | Y | 16 TB | 1 EB |
| xfs | N | Y | Y | 8 EB | 8 EB |
| zfs* | N | Y | Y | 16 EB | 256 ZB |
For more details see Wikipedia comparison. Note that ZFS requires 3rd party kernel module of FUSE layer, so I’ll discount that here. BTRFS only went stable with Linux kernel 3.10, so with Debian Jessie that’s a possibility; but for tried and trusted, I’ll use ext4.
The selection of ext4 also means that I’ll only be able to shrink this file system off-line (unmounted).
I’ll make the filesystem:
# mkfs.ext4 /dev/OptVG/OptLV mke2fs 1.42.12 (29-Aug-2014) Creating filesystem with 1285120 4k blocks and 321280 inodes Filesystem UUID: 4f831d17-2b80-495f-8113-580bd74389dd Superblock backups stored on blocks: Â Â Â Â Â Â Â 32768, 98304, 163840, 229376, 294912, 819200, 884736 Allocating group tables: done Writing inode tables: done Creating journal (32768 blocks): done Writing superblocks and filesystem accounting information: done
And now mount this volume and check it out:
# mount /dev/OptVG/OptLV /opt/
# df -HT /opt
Filesystem              Type  Size  Used Avail Use% Mounted on
/dev/mapper/OptVG-OptLV ext4  5.1G   11M  4.8G   1% /opt
Lastly, we want this to be mounted next time we reboot, so edit /etc/fstab and add the line:
/dev/OptVG/OptLV /opt ext4 noatime,nodiratime 0 0
With this in place, we can now start using this disk. I selected here not to update the filesystem every time I access a file or folder – updates get logged as normal but access time is just ignored.
Time to expand
After some time, our 5 GB /opt/ disk is rather full, and we need to make it bigger, but we wish to do so without any downtime. Amazon EBS doesn’t support resizing volumes, so our strategy is to add a new larger volume, and remove the older one that no longer suits us; LVM and ext4’s online resize ability will allow us to do this transparently.
For this example, we’ll decide that we want a 10 GB volume. It can be a different type of EBS volume to our original – we’re going to online-migrate all our data from one to the other.
As when we created the original 5 GB EBS volume above, create a new one in the same AZ and attach it to the host (perhaps a /dev/xvdh this time). We can check the new volume is visible with dmesg again:
[1999786.341602]Â xvdh: unknown partition table
And now we initalise this as a Physical volume for LVM:
# pvcreate /dev/xvdh
  Physical volume "/dev/xvdh" successfully created
And then add this disk to our existing OptVG Volume Group:
# vgextend OptVG /dev/xvdh
  Volume group "OptVG" successfully extended
We can now review our Volume group with vgs, and see our physical volumes with pvs:
# vgs
  VG    #PV #LV #SN Attr   VSize  VFree
  OptVG   2   1   0 wz--n- 14.99g 10.09g
# pvs
  PV         VG    Fmt  Attr PSize  PFree
  /dev/xvdg  OptVG lvm2 a--   5.00g 96.00m
  /dev/xvdh  OptVG lvm2 a--  10.00g 10.00g
There are now 2 Physical Volumes – we have a 4.9 GB filesystem taking up space, so 10.09 GB of unallocated space in the VG.
Now its time to stop using the /dev/xvgd volume for any new requests:
# pvchange -x n /dev/xvdg
  Physical volume "/dev/xvdg" changed
  1 physical volume changed / 0 physical volumes not changed
At this time, our existing data is on the old disk, and our new data is on the new one. Its now that I’d recommend running GNU screen (or similar) so you can detach from this shell session and reconnect, as the process of migrating the existing data can take some time (hours for large volumes):
# pvmove /dev/sdb1 /dev/sdd1 Â /dev/xvdg: Moved: 0.1% Â /dev/xvdg: Moved: 8.6% Â /dev/xvdg: Moved: 17.1% Â /dev/xvdg: Moved: 25.7% Â /dev/xvdg: Moved: 34.2% Â /dev/xvdg: Moved: 42.5% Â /dev/xvdg: Moved: 51.2% Â /dev/xvdg: Moved: 59.7% Â /dev/xvdg: Moved: 68.0% Â /dev/xvdg: Moved: 76.4% Â /dev/xvdg: Moved: 84.7% Â /dev/xvdg: Moved: 93.3% Â /dev/xvdg: Moved: 100.0%
During the move, checking the Monitoring tab in the AWS EC2 Console for the two volumes should show one with a large data Read metric, and one with a large data Write metric – clearly data should be flowing off the old disk, and on to the new.
A note on disk throughput
The above move was a pretty small, and empty volume. Larger disks will take longer, naturally, so getting some speed out of the process maybe key. There’s a few things we can do to tweak this:
- EBS Optimised: a launch-time option that reserves network throughput from certain instance types back to the EBS service within the AZ. Depending on the size of the instance this is 500 MB/sec up to 4GB/sec. Note that for the c4 family of instances, EBS Optimised is on by default.
- Size of GP2 disk: the larger the disk, the longer it can sustain high IO throughput – but read this for details.
- Size and speed of PIOPs disk: if consistent high IO is required, then moving to Provisioned IO disk may be useful. Looking at the (2 weeks) history of Cloudwatch logs for the old volume will give me some idea of the duty cycle of the disk IO.
Back to the move…
Upon completion I can see that the disk in use is the new disk and not the old one, using pvs again:
# pvs
  PV         VG    Fmt  Attr PSize  PFree
  /dev/xvdg  OptVG lvm2 ---   5.00g 5.00g
  /dev/xvdh  OptVG lvm2 a--  10.00g 5.09g
So all 5 GB is now unused (compare to above, where only 96 MB was PFree). With that disk not containing data, I can tell LVM to remove the disk from the Volume Group:
# vgreduce OptVG /dev/xvdg
  Removed "/dev/xvdg" from volume group "OptVG"
Then I cleanly wipe the labels from the volume:
# pvremove /dev/xvdg
  Labels on physical volume "/dev/xvdg" successfully wiped
If I really want to clean the disk, I could choose to use shred(1) on the disk to overwrite with random data. This can take a lng time
Now the disk is completely unused and disassociated from the VG, I can return to the AWS EC2 Console, and detach the disk:

Wait for a few seconds, and the disk is then shown as “available“; I then chose to delete the disk in the EC2 console (and stop paying for it).
Back to the Logical Volume – it’s still 4.9 GB, so I add 4.5 GB to it:
# lvresize -L +4.5G /dev/OptVG/OptLV Â Size of logical volume OptVG/OptLV changed from 4.90 GiB (1255 extents) to 9.40 GiB (2407 extents). Â Logical volume OptLV successfully resized
We now have 0.6GB free space on the physical volume (pvs confirms this).
Finally, its time to expand out ext4 file system:
# resize2fs /dev/OptVG/OptLV
resize2fs 1.42.12 (29-Aug-2014)
Filesystem at /dev/OptVG/OptLV is mounted on /opt; on-line resizing required
old_desc_blocks = 1, new_desc_blocks = 1
The filesystem on /dev/OptVG/OptLV is now 2464768 (4k) blocks long.
And with df we can now see:
# df -HT /opt/
Filesystem              Type  Size  Used Avail Use% Mounted on
/dev/mapper/OptVG-OptLV ext4  9.9G   12M  9.4G   1% /opt
Automating this
The IAM Role I made at the beginning of this post is now going to be useful. I’ll start by adding an IAM Policy to the Role to permit me to List Volumes, Create Volumes, Attach Volumes and Detach Volumes to my instance-id. Lets start with creating a volume, with a policy like this:
{
  "Version": "2012-10-17",
  "Statement": [
    {
      "Sid": "CreateNewVolumes",
      "Action": "ec2:CreateVolume",
      "Effect": "Allow",
      "Resource": "*",
      "Condition": {
        "StringEquals": {
          "ec2:AvailabilityZone": "us-east-1a",
          "ec2:VolumeType": "gp2"
        },
        "NumericLessThanEquals": {
          "ec2:VolumeSize": "250"
        }
      }
    }
  ]
}
This policy puts some restrictions on the volumes that this instance can create: only within the given Availability Zone (matching our instance), only GP2 SSD (no PIOPs volumes), and size no more than 250 GB. I’ll add another policy to permit this instance role to tag volumes in this AZ that don’t yet have a tag called InstanceId:
{
  "Version": "2012-10-17",
  "Statement": [
    {
      "Sid": "TagUntaggedVolumeWithInstanceId",
      "Action": [
        "ec2:CreateTags"
      ],
      "Effect": "Allow",
      "Resource": "arn:aws:ec2:us-east-1:1234567890:volume/*",
      "Condition": {
        "Null": {
          "ec2:ResourceTag/InstanceId": "true"
        }
      }
    }
  ]
}
Now that I can create (and then tag) volumes, this becomes a simple procedure as to what else I can do to this volume. Deleting and creating snapshots of this volume are two obvious options, and the corresponding policy:
{
  "Version": "2012-10-17",
  "Statement": [
    {
      "Sid": "CreateDeleteSnapshots-DeleteVolume-DescribeModifyVolume",
      "Action": [
        "ec2:CreateSnapshot",
        "ec2:DeleteSnapshot",
        "ec2:DeleteVolume",
        "ec2:DescribeSnapshotAttribute",
        "ec2:DescribeVolumeAttribute",
        "ec2:DescribeVolumeStatus",
        "ec2:ModifyVolumeAttribute"
      ],
      "Effect": "Allow",
      "Resource": "*",
      "Condition": {
        "StringEquals": {
          "ec2:ResourceTag/InstanceId": "i-123456"
        }
      }
    }
  ]
}
Of course it would be lovely if I could use a variable inside the policy condition instead of the literal string of the instance ID, but that’s not currently possible.
Clearly some of the more important actions I want to take are to attach and detach a volume to my instance:
{
  "Version": "2012-10-17",
  "Statement": [
    {
      "Sid": "Stmt1434114682836",
      "Action": [
        "ec2:AttachVolume"
      ],
      "Effect": "Allow",
      "Resource": "arn:aws:ec2:us-east-1:123456789:volume/*",
      "Condition": {
        "StringEquals": {
          "ec2:ResourceTag/InstanceID": "i-123456"
        }
      }
    },
    {
      "Sid": "Stmt1434114745717",
      "Action": [
        "ec2:AttachVolume"
      ],
      "Effect": "Allow",
      "Resource": "arn:aws:ec2:us-east-1:123456789:instance/i-123456"
    }
  ]
}
Now with this in place, we can start to fire up the AWS CLI we spoke of. We’ll let the CLI inherit its credentials form the IAM Instance Role and the polices we just defined.
AZ=`wget -q -O - http://169.254.169.254/latest/meta-data/placement/availability-zone`

Region=`wget -q -O - http://169.254.169.254/latest/meta-data/placement/availability-zone|rev|cut -c 2-|rev`

InstanceId=`wget -q -O - http://169.254.169.254/latest/meta-data/instance-id

VolumeId=`aws ec2 --region ${Region} create-volume --availability-zone ${AZ} --volume-type gp2 --size 1 --query "VolumeId" --output text`

aws ec2 --region ${Region} create-tags --resource ${VolumeID} --tags Key=InstanceId,Value=${InstanceId}

aws ec2 --region ${Region} attach-volume --volume-id ${VolumeId} --instance-id ${InstanceId}
…and at this stage, the above manipulation of the raw block device with LVM can begin. Likewise you can then use the CLI to detach and destroy any unwanted volumes if you are migrating off old block devices.