In 2004, I was living in London, and decided it was time I had my own little virtual private server somewhere online. As a Debian developer since the start of 2000, it had to be Debian, and it still is…
This was before “cloud” as we know it today. Virtual Private Servers (VPS) was a new industry, providing root login to virtual servers that individuals could rent. And so I started being a client of Bytemark, who in turn offered me a discount as a Debian Gnu/Linux developer. With 1 GB of RAM, the initial VPS was very limited, but I ran my own mail server (with multiple domains), several web site s(all with SNI TLS enabled web sites, my own DNS server, and more.
Several years back I took the move to migrate my domains from being self-hosted on a VPS, to using AWS Route53. It was a small incremental cost, but I had long since stopped playing around and experimenting with DNS, and I wanted something that had high availability then a single virtual machine.
I have run a blog on my web site since the mid 1990’s (30+ years now), and WordPress has been my main platform since the late 2000s. This is WordPress now (2024), however a few years back I slotted AWS CloudFront in front of my origin service, to provide some level of global caching.
Several of the websites I run have also moved off to Amazon CloudFront, in particular all my small MTA STS web sites that serve just one small text file: the Mail Transport Agent Strict Transport Security policy document.
I still run my own mail server, with Exim4, PostgresQL, DoveCot Spamd, ClamD, etc. It lets me experiment with low level stuff that I still enjoy.
I have a few other services I want to move out of my VPS and into individual cloud-hosted platforms, but not everything is ready et. However a recent review of my VPC costings, and a forced migration from ByteMark (ioMart) to a new organisation UK Hosting, forced me to reconsider. So I took the inevitable change and migrated the entire VPS to AWS EC2 in Sydney, closer to where I am most of the time.
And so it comes to pass after 20 years, thank you to the team at Bytemark for my UK VPS.
On the first night I arrived in Christchurch, New Zealand for Linux.conf.au 2019, a group of around a dozen attendees went to dinner. Amongst them were Steve Hanley and Hugh Blemmings, whom I have known since the early 2000’s at various LCAs around the region. They asked for some memoirs of LCA – something small; what follows was my throughts, far longer than expected
Stronger encryption requirements for PCI compliance is having a good effect on purging the scourge of the web: legacy browsers, and as they disappear comes even more capability client side for security.
I started web development around late 1994. Some of my earliest paid web work is still online (dated June 1995). Clearly, that was a simpler time for content! I went on to be ‘Webmaster’ (yes, for those joining us in the last decade, that was a job title once) for UWA, and then for Hartley Poynton/JDV.com at time when security became important as commerce boomed online.
At the dawn of the web era, the consideration of backwards compatibility with older web clients (browsers) was deemed to be important; content had to degrade nicely, even without any CSS being applied. As the years stretched out, the legacy became longer and longer. Until now.
In mid-2018, the Payment Card Industry (PCI) Data Security Standard (DSS) 3.2 comes into effect, requiring card holder environments to use (at minimum) TLS 1.2 for the encrypted transfer of data. Of course, that’s also the maximum version typically available today (TLS 1.3 is in draft 21 at this point in time of writing). This effort by the PCI is forcing people to adopt new browsers that can do the TLS 1.2 protocol (and the encryption ciphers that permits), typically by running modern/recent Chrome, Firefox, Safari or Edge browsers. And for the majority of people, Chrome is their choice, and the majority of those are all auto-updating on every release.
Many are pushing to be compliant with the 2018 PCI DSS 3.2 as early as possible; your logging of negotiated protocols and ciphers will show if your client base is ready as well. I’ve already worked with one government agency to demonstrate they were ready, and have already helped disable TLS 1.0 and 1.1 on their public facing web sites (and previously SSL v3). We’ve removed RC4 ciphers, 3DES ciphers, and enabled ephemeral key ciphers to provide forward secrecy.
Web developers (writing Javascript and using various frameworks) can rejoice — the age of having to support legacy MS IE 6/7/8/9/10 is pretty much over. None of those browsers support TLS 1.2 out of the box (IE 10 can turn this on, but for some reason, it is off by default). This makes Javascript code smaller as it doesn’t have to have conditional code to work with the quirks of those older clients.
But as we find ourselves with modern clients, we can now ask those clients to be complicit in our attempts to secure the content we serve. They understand modern security constructs such as Content Security Policies and other HTTP security-related headers.
There’s two tools I am currently using to help in this battle to improve web security. One is SSLLabs.com, the work of Ivan Ristić (and now owned/sponsored by Qualys). This tool gives a good view of the encryption in flight (protocols, ciphers), chain of trust (certificate), and a new addition of checking DNS records for CAA records (which I and others piled on a feature request for AWS Route53 to support). The second tool is Scott Helm’s SecurityHeaders.io, which looks at the HTTP headers that web content uses to ask browsers to enforce security on the client side.
There’s a really important reason why these tools are good; they are maintained. As new recommendations on ciphers, protocols, signature algorithms or other actions become recommended, they’re updated on these tools. And these tools are produced by very small, but agile teams — like one person teams, without the bureaucracy (and lag) associated with large enterprise tools. But these shouldn’t be used blindly. These services make suggestions, and you should research them yourselves. For some, not all the recommendations may meet your personal risk profile. Personally, I’m uncomfortable with Public-Key-Pins, so that can wait for a while — indeed, Chrome has now signalled they will drop this.
So while PCI is hitting merchants with their DSS-compliance stick (and making it plainly obvious what they have to do), we’re getting a side-effect of having a concrete reason for drawing a line under where our backward compatibility must stretch back to, and the ability to have the web client assist in ensure security of content.
I’m at an airport, about to board the first of three flights across the world, from timezone +8 to timezone -8. I’ll be in transit 27 hours to get to Seattle, Washington state. I’m leaving my wife and two young children behind.
My work has given me a days’ worth of leave under the Corporate Social Responsibility program, and I’m taking three days’ annual leave, to do this. 27 hours each way in transit, for 3 days on the ground.
Why?
Backstory
I started playing in technology as a kid in the 1980s; my first PC was a clone (as they were called) 286 running MS-DOS. It was clunky, and the most I could do to extend it was to write batch scripts. As a child I had no funds for commercial compilers, no network connections (this was pre Internet in Australia), no access to documentation, and no idea where to start programming properly.
It was a closed world.
I hit university in the summer of 1994 to study Computer Science and French. I’d heard of Linux, and soon found myself installing the Linux distributions of the day. The Freedom of the licensing, the encouragement to use, modify, share, was in stark contrast to the world of consumer PCs of the late 1980’s.
It was there at the UCC at UWA I discovered Debian. Some of the kind network/system admins at the University maintained a Debian mirror on the campus LAN, updated regularly and always online. It was fast, and more importantly, free for me to access. Back in the 1990s, bandwidth in Australia was incredibly expensive. The vast distances of the country mean that bandwidth was scarce. Telcos were in races to put fiber between Perth and the Eastern States, and without that in place, IP connectivity was constrained, and thus costly.
Over many long days and nights I huddled down, learning window managers, protocols, programming and scripting languages. I became… a system/network administrator, web developer, dev ops engineer, etc. My official degree workload, algorithmic complexity, protocol stacks, were interesting, but fiddling with Linux based implementations was practical.
Volunteer
After years of consuming the output of Debian – and running many services with it – I decided to put my hand up and volunteer as a Debian Developer: it was time to give back. I had benefited from Debian, and I saw others benefit from it as well.
As the 2000’s started, I had my PGP key in the Debian key ring. I had adopted a package and was maintaining it – load balancing Apache web servers. The web was yet to expand to the traffic levels you see today; most web sites were served from one physical web server. Site Reliability Engineering was a term not yet dreamed of.
What became more apparent was the applicability of Linux, Open Source, and in my line-of-sight Debian to a wider community beyond myself and my university peers. Debain was being used to revive recycled computers that were being donated to charities; in some cases, unable to transfer commercial software licenses with the hardware that was no longer required by organisations that had upgraded. It appeared that Debian was being used as a baseline above which society in general had access to fundamental capability of computing and network services.
The removal of subscriptions, registrations, and the encouragement of distribution meant this occurred at rates that could never be tracked, and more importantly, the consensus was that it should not be automatically tracked. The privacy of the user is paramount – more important than some statistics for the Developer to ponder.
When the Bosnia-Herzegovina war ended in 1995, I recall an email from academics there, having found some connectivity, writing to ask if they would be able to use Debian as part of their re-deployment of services for the Tertiary institutions in the region. This was an unnecessary request as Debian GNU/Linux is freely available, but it was a reminder that, for the country to have tried to procure commercial solutions at that time would have been difficult. Instead, those that could do the task just got on with it.
There’s been many similar project where the grass-roots organisations – non profits, NGOs, and even just loose collectives of individuals – have turned to Linux, Open Source, and sometimes Debian to solve their problems. Many fine projects have been established to make technology accessible to all, regardless of race, gender, nationality, class, or any other label society has used to divide humans. Big hat tip to Humanitarian Open Street Map, Serval Project.
I’ve always loved Debian’s position on being the Universal operating system. Its’ vast range of packages and wide range of computing architectures supported means that quite often a litmus test of “is project X a good project?” was met with “is it packaged for Debian?”. That wide range of architectures has meant that administrators of systems had fewer surprises and a faster adoption cycle when changing platforms, such as the switch from x86 32 bit to x86 64 bit.
Enter the Cloud
I first laid eyes on the AWS Cloud in 2008. It was nothing like the rich environment you see today. The first thing I looked for was my favourite operating system, so that what I already knew and was familiar with was available in this environment to minimise the learning curve. However there were no official images, which was disconcerting.
In 2012 I joined AWS as an employee. Living in Australia they hired me into the field sales team as a Solution Architect – a sort of pre-sales tech – with a customer focused depth in security. It was a wonderful opportunity, and I learnt a great deal. It also made sense (to me, at least) to do something about getting Debian’s images blessed.
It turned out, that I had to almost define what that was: images endorsed by a Debian Developer, handed to the AWS Marketplace team. And so since 2013 I have done so, keeping track of Debian’s releases across the AWS regions, collaborating with other Debian folk on other cloud platforms to attempt a unified approach to generating and maintaining these images. This included (for a stint) generating them into the AWS GovCloud Region, and still into the AWS China (Beijing) Region – the other side of the so-called Great Firewall of China.
So why the trip?
We’ve had focus groups at the Debconf (Debian conference) around the world, but its often difficult to get the right group of people in the same rooms at the same time. So the proposal was to hold a focused Debian Cloud Sprint. Google was good enough to host this, for all the volunteers across all the cloud providers. Furthermore, donated funds were found to secure the travel for a set of people to attend who otherwise could not.
I was lucky enough to be given a flight.
So here I am, in the terminal in Australia: my kids are tucked up in bed, dreaming of the candy they just collected for Halloween. It will be a draining week I am sure, but if it helps set and improve the state of Debian then its worth it.
The recent AWS introduction of the Elastic File System gives you an automatic grow-and-shrink capability as an NFS mount, an exciting option that takes away the previous overhead in creating shared block file systems for EC2 instances.
However it should be noted that the same auto-management of capacity is not true in the EC2 instance’s Elastic Block Store (EBS) block storage disks; sizing (and resizing) is left to the customer. With current 2015 EBS, one cannot simply increase the size of an EBS Volume as the storage becomes full; (as at June 2015) an EBS volume, once created, has fixed size. For many applications, that lack of resize function on its local EBS disks is not a problem; many server instances come into existence for a brief period, process some data and then get Terminated, so long term managment is not needed.
However for a long term data store on an instance (instead of S3, which I would recommend looking closely at from a durability and pricing fit), and where I want to harness the capacity to grow (or shrink) disk for my data, then I will need to leverage some slightly more advanced disk management. And just to make life interesting, I wish to do all this while the data is live and in-use, if possible.
Enter: Logical Volume Management, or LVM. It’s been around for a long, long time: LVM 2 made a debut around 2002-2003 (2.00.09 was Mar 2004) — and LVM 1 was many years before that — so it’s pretty mature now. It’s a powerful layer that sits between your raw storage block devices (as seen by the operating system), and the partitions and file systems you would normally put on them.
In this post, I’ll walk through the process of getting set up with LVM on Debian in the AWS EC2 environment, and how you’d do some basic maintenance to add and remove (where possible) storage with minimal interruption.
Getting Started
First a little prep work for a new Debian instance with LVM.
As I’d like to give the instance its own ability to manage its storage, I’ll want to provision an IAM Role for EC2 Instances for this host. In the AWS console, visit IAM, Roles, and I’ll create a new Role I’ll name EC2-MyServer (or similar), and at this point I’ll skip giving it any actual privileges (later we’ll update this). As at this date, we can only associate an instance role/profile at instance launch time.
Now I launch a base image Debian EC2 instance launched with this IAM Role/Profile; the root file system is an EBS Volume. I am going to put data that I’ll be managing on a separate disk from the root file system.
First, I need to get the LVM utilities installed. It’s a simple package to install: the lvm2 package. From my EC2 instance I need to get root privileges (sudo -i) and run:
apt update && apt install lvm2
After a few moments, the package is installed. I’ll choose a location that I want my data to live in, such as /opt/. I want a separate disk for this task for a number of reasons:
Root EBS volumes cannot currently be encrypted using Amazon’s Encrypted EBS Volumes at this point in time. If I want to also use AWS’ encryption option, it’ll have to be on a non-root disk. Note that instance-size restrictions also exist for EBS Encrypted Volumes.
It’s possibly not worth make a snapshot of the Operating System at the same time as the user content data I am saving. The OS install (except the /etc/ folder) can almost entirely be recreated from a fresh install. so why snapshot that as well (unless that’s your strategy for preserving /etc, /home, etc).
The type of EBS volume that you require may be different for different data: today (Apr 2015) there is a choice of Magnetic, General Purpose 2 (GP2) SSD, and Provisioned IO/s (PIOPS) SSD, each with different costs; and depending on our volume, we may want to select one for our root volume (operating system), and something else for our data storage.
I may want to use EBS snapshots to clone the disk to another host, without the base OS bundled in with the data I am cloning.
I will create this extra volume in the AWS console and present it to this host. I’ll start by using a web browser (we’ll use CLI later) with the EC2 console.
The first piece of information we need to know is where my EC2 instance is running. Specifically, the AWS Region and Availability Zone (AZ). EBS Volumes only exist within the one designated AZ. If I accidentally make the volume(s) in the wrong AZ, then I won’t be able to connect them to my instance. It’s not a huge issue, as I would just delete the volume and try again.
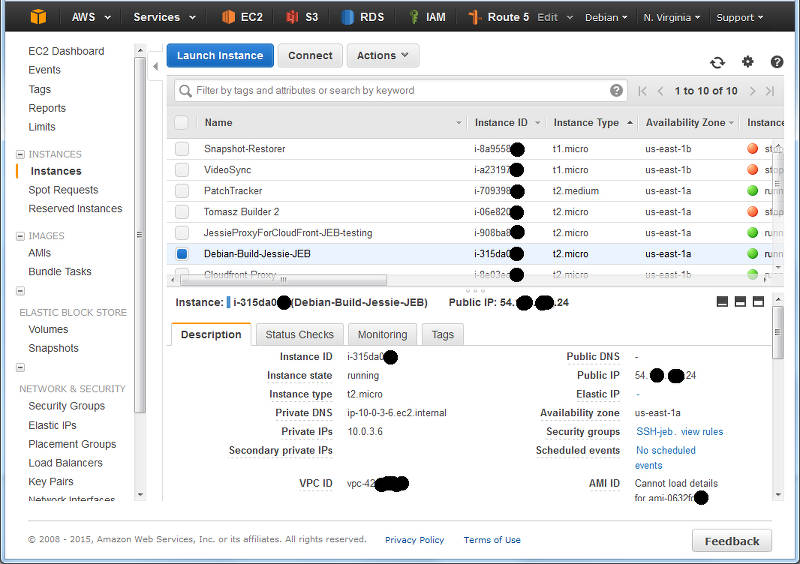
I navigate to the “Instances” panel of the EC2 Console, and find my instance in the list:
A (redacted) list of instance from the EC2 console.
Here I can see I have located an instance and it’s running in US-East-1A: that’s AZ A in Region US-East-1. I can also grab this with a wget from my running Debian instance by asking the MetaData server:
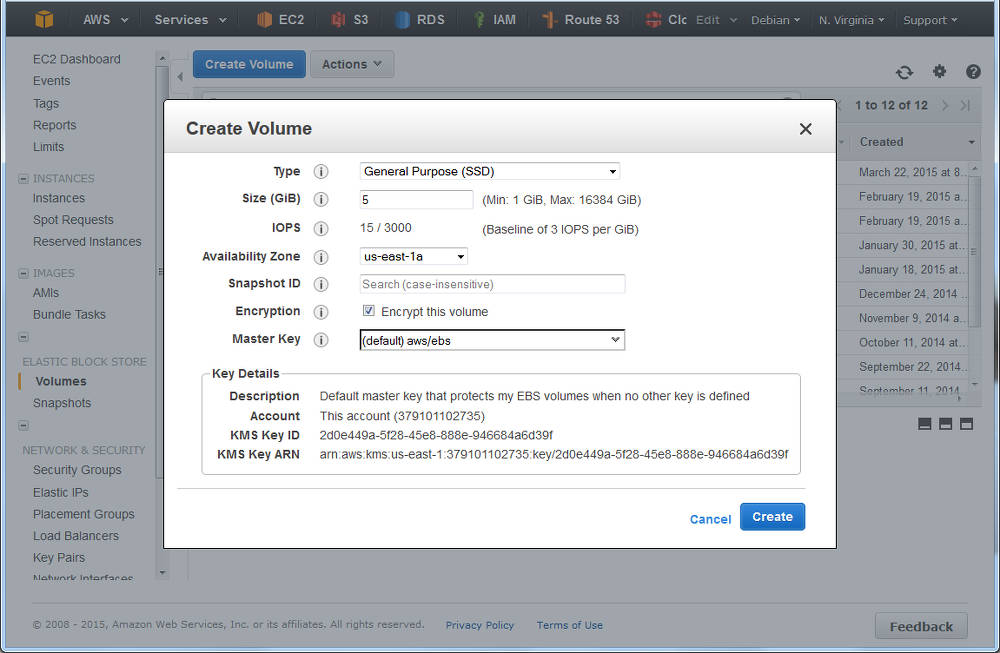
Time to navigate to “Elastic Block Store“, choose “Volumes” and click “Create“:
Creating a volume in AWS EC2: ensure the AZ is the same as your instance
You’ll see I selected that I wanted AWS to encrypt this and as noted above, at this time that doesn’t include the t2 family. However, you have an option of using encryption with LVM – where the customer looks after the encryption key – see LUKS.
What’s nice is that I can do both — have AWS Encrypted Volumes, and then use encryption on top of this, but I have to manage my own keys with LUKS, and should I lose them, then I can keep all the cyphertext!
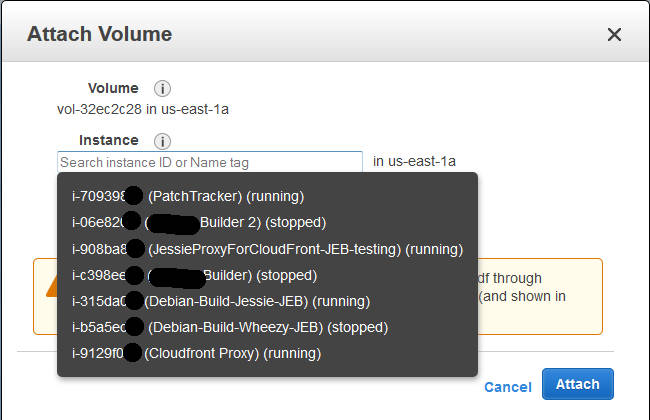
I deselected this for my example (with a t2.micro), and continue; I could see the new volume in the list as “creating”, and then shortly afterwards as “available”. Time to attach it: select the disk, and either right-click and choose “Attach“, or from the menu at the top of the list, chose “Actions” -> “Attach” (both do the same thing).
Attaching a volume to an instance: you’ll be prompted for the compatible instances in the same AZ.
At this point in time your EC2 instance will now notice a new disk; you can confirm this with “dmesg |tail“, and you’ll see something like:
[1994151.231815]Â xvdg: unknown partition table
(Note the time-stamp in square brackets will be different).
Previously at this juncture you would format the entire disk with your favourite file system, mount it in the desired location, and be done. But we’re adding in LVM here – between this “raw” device, and the filesystem we are yet to make….
Marking the block device for LVM
Our first operation with LVM is to put a marker on the volume to indicate it’s being use for LVM – so that when we scan the block device, we know what it’s for. It’s a really simple command:
pvcreate /dev/xvdg
The device name above (/dev/xvdg) should correspond to the one we saw from the dmesg output above. The output of the above is rather straight forward:
 Physical volume "/dev/xvdg" successfully created
Checking our EBS Volume
We can check on the EBS volume – which LVM sees as a Physical Volume – using the “pvs” command.
# pvs
  PV         VG   Fmt  Attr PSize PFree
  /dev/xvdg       lvm2 ---  5.00g 5.00g
Here we see the entire disk is currently unused.
Creating our First Volume Group
Next step, we need to make an initial LVM Volume Group which will use our Physical volume (xvdg). The Volume Group will then contain one (or more) Logical Volumes that we’ll format and use. Again, a simple command to create a volume group by giving it its first physical device that it will use:
# vgcreate  OptVG /dev/xvdg
  Volume group "OptVG" successfully created
And likewise we can check our set of Volume Groups with ” vgs”:
# vgs
  VG    #PV #LV #SN Attr   VSize VFree
  OptVG   1   0   0 wz--n- 5.00g 5.00g
The Attribute flags here indicate this is writable, resizable, and allocating extents in “normal” mode. Lets proceed to make our (first) Logical Volume in this Volume Group:
# lvcreate -n OptLV -L 4.9G OptVG
  Rounding up size to full physical extent 4.90 GiB
  Logical volume "OptLV" created
You’ll note that I have created our Logical Volume as almost the same size as the entire Volume Group (which is currently one disk) but I left some space unused: the reason for this comes down to keeping some space available for any jobs that LVM may want to use on the disk – and this will be used later when we want to move data between raw disk devices.
If I wanted to use LVM for Snapshots, then I’d want to leave more space free (unallocated) again.
We can check on our Logical Volume:
# lvs
  LV    VG    Attr       LSize Pool Origin Data%  Meta%  Move Log Cpy%Sync Convert
  OptLV OptVG -wi-a----- 4.90g
The attribytes indicating that the Logical Volume is writeable, is allocating its data to the disk in inherit mode (ie, as the Volume Group is doing), and that it is active. At this stage you may also discover we have a device /dev/OptVG/OptLV, and this is what we’re going to format and mount. But before we do, we should review what file system we’ll use.
Filesystems
Popular Linux file systems
Name
Shrink
Grow
Journal
Max File Sz
Max Vol Sz
btrfs
Y
Y
N
16 EB
16 EB
ext3
Y off-line
Y
Y
2 TB
32 TB
ext4
Y off-line
Y
Y
16 TB
1 EB
xfs
N
Y
Y
8 EB
8 EB
zfs*
N
Y
Y
16 EB
256 ZB
For more details see Wikipedia comparison. Note that ZFS requires 3rd party kernel module of FUSE layer, so I’ll discount that here. BTRFS only went stable with Linux kernel 3.10, so with Debian Jessie that’s a possibility; but for tried and trusted, I’ll use ext4.
The selection of ext4 also means that I’ll only be able to shrink this file system off-line (unmounted).
I’ll make the filesystem:
# mkfs.ext4 /dev/OptVG/OptLV
mke2fs 1.42.12 (29-Aug-2014)
Creating filesystem with 1285120 4k blocks and 321280 inodes
Filesystem UUID: 4f831d17-2b80-495f-8113-580bd74389dd
Superblock backups stored on blocks:
        32768, 98304, 163840, 229376, 294912, 819200, 884736

Allocating group tables: done
Writing inode tables: done
Creating journal (32768 blocks): done
Writing superblocks and filesystem accounting information: done
And now mount this volume and check it out:
# mount /dev/OptVG/OptLV /opt/
# df -HT /opt
Filesystem             Type Size Used Avail Use% Mounted on
/dev/mapper/OptVG-OptLV ext4Â 5.1GÂ Â 11MÂ 4.8GÂ Â 1% /opt
Lastly, we want this to be mounted next time we reboot, so edit /etc/fstab and add the line:
/dev/OptVG/OptLV /opt ext4 noatime,nodiratime 0 0
With this in place, we can now start using this disk. I selected here not to update the filesystem every time I access a file or folder – updates get logged as normal but access time is just ignored.
Time to expand
After some time, our 5 GB /opt/ disk is rather full, and we need to make it bigger, but we wish to do so without any downtime. Amazon EBS doesn’t support resizing volumes, so our strategy is to add a new larger volume, and remove the older one that no longer suits us; LVM and ext4’s online resize ability will allow us to do this transparently.
For this example, we’ll decide that we want a 10 GB volume. It can be a different type of EBS volume to our original – we’re going to online-migrate all our data from one to the other.
As when we created the original 5 GB EBS volume above, create a new one in the same AZ and attach it to the host (perhaps a /dev/xvdh this time). We can check the new volume is visible with dmesg again:
[1999786.341602]Â xvdh: unknown partition table
And now we initalise this as a Physical volume for LVM:
# pvcreate /dev/xvdh
  Physical volume "/dev/xvdh" successfully created
And then add this disk to our existing OptVG Volume Group:
# vgextend OptVG /dev/xvdh
  Volume group "OptVG" successfully extended
We can now review our Volume group with vgs, and see our physical volumes with pvs:
# vgs
  VG    #PV #LV #SN Attr   VSize  VFree
  OptVG   2   1   0 wz--n- 14.99g 10.09g
# pvs
  PV         VG    Fmt  Attr PSize  PFree
  /dev/xvdg  OptVG lvm2 a--   5.00g 96.00m
  /dev/xvdh  OptVG lvm2 a--  10.00g 10.00g
There are now 2 Physical Volumes – we have a 4.9 GB filesystem taking up space, so 10.09 GB of unallocated space in the VG.
Now its time to stop using the /dev/xvgd volume for any new requests:
# pvchange -x n /dev/xvdg
  Physical volume "/dev/xvdg" changed
  1 physical volume changed / 0 physical volumes not changed
At this time, our existing data is on the old disk, and our new data is on the new one. Its now that I’d recommend running GNU screen (or similar) so you can detach from this shell session and reconnect, as the process of migrating the existing data can take some time (hours for large volumes):
# pvmove /dev/sdb1 /dev/sdd1
  /dev/xvdg: Moved: 0.1%
  /dev/xvdg: Moved: 8.6%
  /dev/xvdg: Moved: 17.1%
  /dev/xvdg: Moved: 25.7%
  /dev/xvdg: Moved: 34.2%
  /dev/xvdg: Moved: 42.5%
  /dev/xvdg: Moved: 51.2%
  /dev/xvdg: Moved: 59.7%
  /dev/xvdg: Moved: 68.0%
  /dev/xvdg: Moved: 76.4%
  /dev/xvdg: Moved: 84.7%
  /dev/xvdg: Moved: 93.3%
  /dev/xvdg: Moved: 100.0%
During the move, checking the Monitoring tab in the AWS EC2 Console for the two volumes should show one with a large data Read metric, and one with a large data Write metric – clearly data should be flowing off the old disk, and on to the new.
A note on disk throughput
The above move was a pretty small, and empty volume. Larger disks will take longer, naturally, so getting some speed out of the process maybe key. There’s a few things we can do to tweak this:
EBS Optimised: a launch-time option that reserves network throughput from certain instance types back to the EBS service within the AZ. Depending on the size of the instance this is 500 MB/sec up to 4GB/sec. Note that for the c4 family of instances, EBS Optimised is on by default.
Size of GP2 disk: the larger the disk, the longer it can sustain high IO throughput – but read this for details.
Size and speed of PIOPs disk: if consistent high IO is required, then moving to Provisioned IO disk may be useful. Looking at the (2 weeks) history of Cloudwatch logs for the old volume will give me some idea of the duty cycle of the disk IO.
Back to the move…
Upon completion I can see that the disk in use is the new disk and not the old one, using pvs again:
# pvs
  PV         VG    Fmt  Attr PSize  PFree
  /dev/xvdg  OptVG lvm2 ---   5.00g 5.00g
  /dev/xvdh  OptVG lvm2 a--  10.00g 5.09g
So all 5 GB is now unused (compare to above, where only 96 MB was PFree). With that disk not containing data, I can tell LVM to remove the disk from the Volume Group:
# vgreduce OptVG /dev/xvdg
  Removed "/dev/xvdg" from volume group "OptVG"
Then I cleanly wipe the labels from the volume:
# pvremove /dev/xvdg
  Labels on physical volume "/dev/xvdg" successfully wiped
If I really want to clean the disk, I could choose to use shred(1) on the disk to overwrite with random data. This can take a lng time
Now the disk is completely unused and disassociated from the VG, I can return to the AWS EC2 Console, and detach the disk:
Detach an EBS volume from an EC2 instance
Wait for a few seconds, and the disk is then shown as “available“; I then chose to delete the disk in the EC2 console (and stop paying for it).
Back to the Logical Volume – it’s still 4.9 GB, so I add 4.5 GB to it:
# lvresize -L +4.5G /dev/OptVG/OptLV
  Size of logical volume OptVG/OptLV changed from 4.90 GiB (1255 extents) to 9.40 GiB (2407 extents).
  Logical volume OptLV successfully resized
We now have 0.6GB free space on the physical volume (pvs confirms this).
Finally, its time to expand out ext4 file system:
# resize2fs /dev/OptVG/OptLV
resize2fs 1.42.12 (29-Aug-2014)
Filesystem at /dev/OptVG/OptLV is mounted on /opt; on-line resizing required
old_desc_blocks = 1, new_desc_blocks = 1
The filesystem on /dev/OptVG/OptLV is now 2464768 (4k) blocks long.
And with df we can now see:
# df -HT /opt/
Filesystem             Type Size Used Avail Use% Mounted on
/dev/mapper/OptVG-OptLV ext4Â 9.9GÂ Â 12MÂ 9.4GÂ Â 1% /opt
Automating this
The IAM Role I made at the beginning of this post is now going to be useful. I’ll start by adding an IAM Policy to the Role to permit me to List Volumes, Create Volumes, Attach Volumes and Detach Volumes to my instance-id. Lets start with creating a volume, with a policy like this:
{
  "Version": "2012-10-17",
  "Statement": [
    {
      "Sid": "CreateNewVolumes",
      "Action": "ec2:CreateVolume",
      "Effect": "Allow",
      "Resource": "*",
      "Condition": {
        "StringEquals": {
          "ec2:AvailabilityZone": "us-east-1a",
          "ec2:VolumeType": "gp2"
        },
        "NumericLessThanEquals": {
          "ec2:VolumeSize": "250"
        }
      }
    }
  ]
}
This policy puts some restrictions on the volumes that this instance can create: only within the given Availability Zone (matching our instance), only GP2 SSD (no PIOPs volumes), and size no more than 250 GB. I’ll add another policy to permit this instance role to tag volumes in this AZ that don’t yet have a tag called InstanceId:
{
  "Version": "2012-10-17",
  "Statement": [
    {
      "Sid": "TagUntaggedVolumeWithInstanceId",
      "Action": [
        "ec2:CreateTags"
      ],
      "Effect": "Allow",
      "Resource": "arn:aws:ec2:us-east-1:1234567890:volume/*",
      "Condition": {
        "Null": {
          "ec2:ResourceTag/InstanceId": "true"
        }
      }
    }
  ]
}
Now that I can create (and then tag) volumes, this becomes a simple procedure as to what else I can do to this volume. Deleting and creating snapshots of this volume are two obvious options, and the corresponding policy:
{
  "Version": "2012-10-17",
  "Statement": [
    {
      "Sid": "CreateDeleteSnapshots-DeleteVolume-DescribeModifyVolume",
      "Action": [
        "ec2:CreateSnapshot",
        "ec2:DeleteSnapshot",
        "ec2:DeleteVolume",
        "ec2:DescribeSnapshotAttribute",
        "ec2:DescribeVolumeAttribute",
        "ec2:DescribeVolumeStatus",
        "ec2:ModifyVolumeAttribute"
      ],
      "Effect": "Allow",
      "Resource": "*",
      "Condition": {
        "StringEquals": {
          "ec2:ResourceTag/InstanceId": "i-123456"
        }
      }
    }
  ]
}
Of course it would be lovely if I could use a variable inside the policy condition instead of the literal string of the instance ID, but that’s not currently possible.
Clearly some of the more important actions I want to take are to attach and detach a volume to my instance:
Now with this in place, we can start to fire up the AWS CLI we spoke of. We’ll let the CLI inherit its credentials form the IAM Instance Role and the polices we just defined.
…and at this stage, the above manipulation of the raw block device with LVM can begin. Likewise you can then use the CLI to detach and destroy any unwanted volumes if you are migrating off old block devices.