For those not familiar, SSH is the Secure Shell, an encrypted login system that has been in use for over 25 years. It replaced unencrypted Telnet for remote (text) terminal connections used to access (and administer) systems over remote networks.
Authentication for SSH can be done in multiple ways: simple passwords (not recommended), SSH Keys, and even MFA.
SSH keys is perhaps one of the most common ways; its simple, free, and relatively easy to understand. It uses asymmetric key pairs, consisting of a Private key, and a Public Key.
Understandably, the Private key is kept private, only on your local system perhaps, and the Public key which is openly distributed to any system that wishes to give you access.
For a long time, the Key algorithm used here was the RSA algorithm, and keys had a particular size (length) measured in bits. In the 1990s, 128 bits was considered enough,but more recently, 2048 bits and beyond has been used. The length of the key was one factor to the complexity of guessing the correct combination: fewer bits means smaller numbers. However, the RSA algorithm becomes quiet slow when key sizes start to get quite large, and people (and systems) start to notice a few seconds of very busy CPU when trying to connect across the network.
Luckily, a replacement key algorithm has been around for some time, leveraging Elliptical Curves. This article gives some overview of the Edwards Curve Elliptical Curve for creating the public and private key.
What we see is keys that are smaller compared to RSA keys of similar cryptographic strength, but more importantly, the CPU load is not as high.
OpenSSH and Putty have supported Edwards curves for some time (as at 2022), and several years ago, I requested support from AWS for the EC2 environment. Today, that suggestion/wish-list item has come to fruition with this:
Amazon EC2 customers can now use ED25519 keys for authentication with EC2 Instance Connect
AWS has been one of the last places I was still using RSA based keys, so now I can start planning their total removal.
- Clearly generating a new ED25519 key is the first step. PuttyGen can do this, as can ssh-keygen. Save the key, and make sure you grab a copy of the OpenSSH format of the key (a single line that starts with
ssh-ed25519and is followed by a string representing the key, and optionally a space and comment at the end). I would recommend having the Comment include the person name, year and possibly even the key type, so that you can identify which key for which individual. - You can publish the Public Key to systems that will accept this key – and this can be done in parallel to the existing key still being in place. The public key has no problem with being shared and advertised publicly – its in the name. The worse thing that someone can do with your public key is give you access to their system. In Linux systems, this is typically by adding a line to the
~/.ssh/authorized_keysfile (note: US spelling); just add a new line starting with “ssh-ed25519”. From this point, these systems will trust the key. - Next you can test access using this key for the people (or systems) that will need access. Ensure you only give the key to those systems or people that should use it. Eg, yourself. When you sign in, look for evidence that shows the new key was used. For example, the Comment on the key (see point 1 above) may be displayed, such as:

- Lastly you can remove the older key being trusted for remote access from those systems. For your first system, you may one to leave one SSH session connected, remove the older SSH key from the Authorized Keys file, and then initiate a second new connection to ensure you still have access.
Now that we have familiarity with this, we need to look at places where the older key may be used.
In the AWS environment, SSH Public Keys are stored in the Amazon EC2 environment for provision to new EC2 instances (hosts). This may be referenced and deployed during instance start time; but it can also be referenced as part of a Launch Configuration (LC) or Launch Template (LT). These LCs and LTs will need to be updated, so that any subsequent EC2 launches are provisioned with the new key. Ideally you have these defined in a CloudFormation Template; hence adjusting this template and updating the stack is necessary; this will likely trigger a replacement of the current instances, so schedule this operation accordingly (and test in lower environments first).
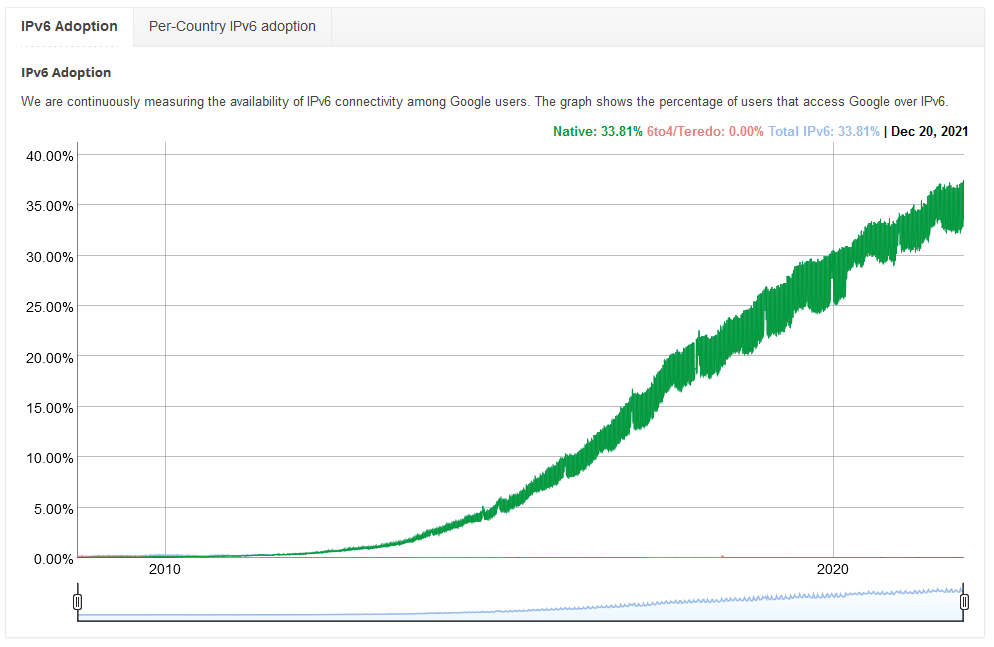
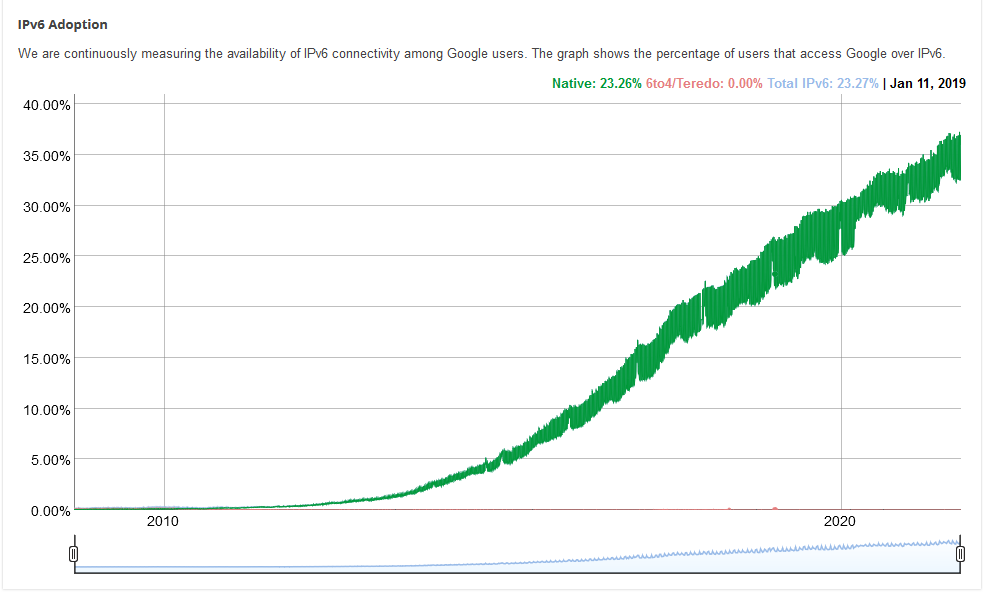
There’s no sudden emergency for this switch; it is part of the continual sunrise and sunset of technologies, and address the technical debt in a systematic and continual way, just as you would migrate in AWS from GP2 to GP3 SSD EBS volumes, from one EC2 instance family to the next, from the Instance MetaData v1 to v2, and or from IPv4 to dual-stack IPv6.